Tuesday, October 26, 2010

Shopping: Fashion Design Books

We're down to our last few NYC craft stores! Here we have Fashion Design Books right on the FIT campus, but it's not the FIT bookstore.

IMG_2274.JPG

There are lots of sewing related textbooks and tools available... it looks like a good place to be for a fashion design student. :D Here's a couple of items I picked up that I absolutely love.  I didn't see them here in Texas before NYC, but I saw that my local Joann carries it, too, once I got back of course... they were just in the quilting section.

IMG_2362.JPG
IMG_2361.JPG

These are now my go-to marking tools. There were some bad reviews for the chalk set due to markings being permanent. I haven't had an issue, but I would recommend that you test on the fabric first.

Sunday, October 24, 2010

FO: Vogue 8489 Dress

Progess is slow on the sewing front. I did start experimenting with handstitching on the Lady Grey, but more on that later. Today, I have a finished dress to show you!

V8489.jpg


Pattern: Vogue 8489 knit dress in view E
Fabric: Stylized Floral Jersey from Gorgeous Fabrics bought in 2008 @ $10/yd and black jersey from 2008
Other: black fusible tricot interfacing for the neck and midriff bands @ $3/yd
Mods: no zipper
Total Cost: approx. $27.00

IMG_2448.JPG

I bought this fabric, which looks like there are still a couple of yards left, with the intention of using this pattern over two years ago. It's now finally complete.

Cennetta from The Mahogany Stylist also used this fabric to make this dress. You can see what this dress would look like without the contrasting neck and midriff bands.

Overall, it's a easy knit dress. The fusible tricot had enough stretch in it that I didn't need the zipper in the back. It's very comfortable and very slimming. I did slipstitch the facings by hand, which was nice and relaxing to do with wine and friends. The only thing that I don't like about this is dress is that it's VERY LOW cut but that can be fixed with a camisole.

IMG_2523.JPG

IMG_2524.JPG

Friday, October 1, 2010

WIP: Lady Grey Muslin

The Muslin Stage

sew-along_banner2_150x150

Fabric: White cotton twill from fabric.com back in 2008 @ $3.50/yd (I think I used about 2.5 yds)


Notes: This is my first official time I've made a muslin (I made one other muslin a few months ago but it's not even done), and I'm enjoying the process very much. I don't know if I'd make a muslin for every garment I make since it's rather involved, but I'll definitely consider it for my more expensive fabric and complicated patterns.


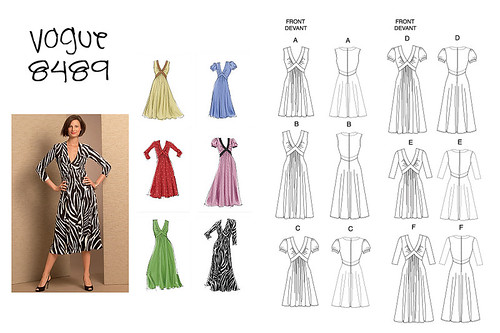
Steps: Aside from the pattern tracing and cutting, I followed Gertie's muslin steps. Here's a simple breakdown.... this is more for my reference in the future.
  1. Extend seam allowance to 1".
  2. Thread trace seam lines.
  3. Baste pieces together.
  4. Press seam and hem allowances.
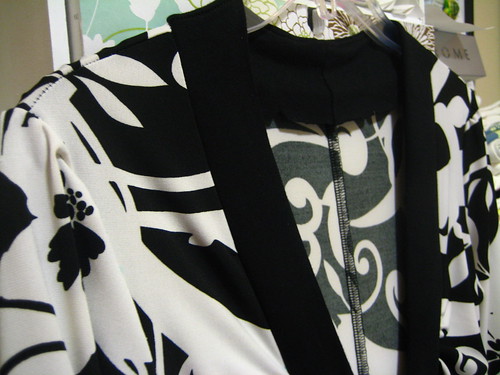
It looks kind of weird just hanging here... it looks much better on, but you can see the 1" seam allowances and the thread traced seam lines.
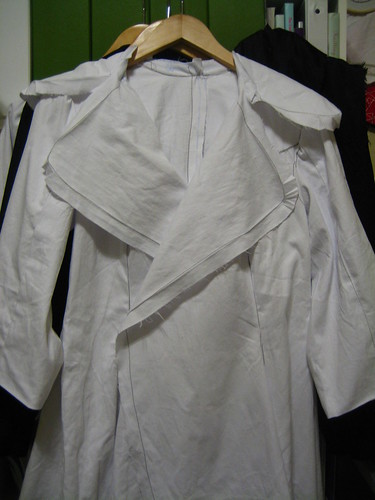
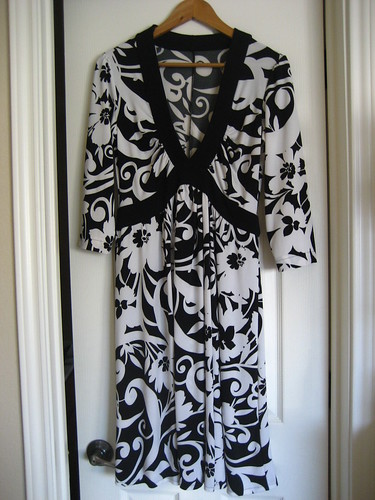
IMG_2388.JPG


The Result:

LadyGreyMuslinI.jpg

I didn't hem or pin the hem allowance all the way so you can see bits of hanging out... oops!

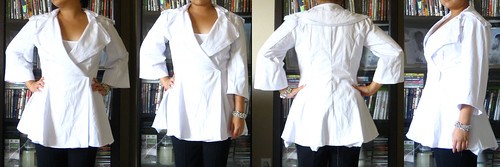
Conclusion: I'm satisfied with the result and it doesn't look like I need to make any changes as far as I can see. Do you notice any draglines or adjustments I may need? Please let me know if you do! The lighting does make it difficult to see any draglines, too... The only thing I need to work on is setting in sleeves... I've never been good at this, and I want to perfect it for this project... do you think that will be too difficult?