Showing posts with label accessories. Show all posts

Sunday, June 27, 2010

FO: Father's Day Ties

Pattern:  Father's Day Ties by the Purl Bee
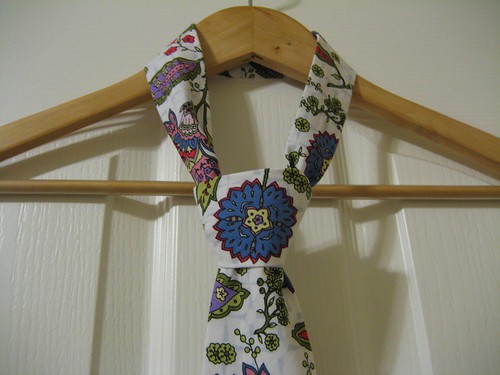
Fabric:  Art Gallery Fabrics Retro-spective Kitchen Bouquet in blue (This was bought at my local fabric shop, The Common Thread.)

I LoVE this fabric!!! It feels like there's a super high thread count and doesn't feel like a typical quilting cotton. I used less than a yard of this fabric to make two ties; however, I wouldn't recommend getting less than a yard since it needs to be cut on the bias.

I made two of these ties out of the same fabric... one for my daddy and one for my father-in-law. They can match! :)

Father's Day Tie

I was able to get a flower right in the middle of the tie... I shouldn't have undone it... oh well!


Tips:
  1. When using quilting weight, omit the heavyweight sew-in interfacing.
  2. Make sure the fold-lines of the pattern are on the fold-lines of the fabric. I cut the middle piece incorrectly and it make my tie shorter, but it's still long enough to be a tie.
  3. The back-end piece is a little wide when compared to a store bought tie. When tying a double knot, I had to wrap it tightly in order to get the right length... but this is also due to mine be shorter than the pattern.
  4. Be ready to TONS of hand sewing.
Here's a cute gift box idea I used to box the tie in...
Father's Day Shirt & Tie Gift Box by Paper Crave

Yes, I was in a rush and just used tape to adhere the bow tie. Hehe...
Father's Day Gift Box

Monday, January 18, 2010

UT Regular Guy Beanie

My second finished item for 2010!  :)  It's a beanie for my husband.  I started this in December, but finally got around to finishing it.  It's a pretty easy, standard beanie... used the Regular Guy Beanie.

I put the UT in front of the name because of the "burnt orange" color.  :)


(Actually, we're watching the Texas vs. Kansas State men's basketball right now.  Go Horns!)  I love the "star" pattern created at the top of the beanie from the decreases.


The only thing I didn't like about the pattern is that the top was a little pointy as seen in the top photo... the picture is with a little stretching, too.  Once it's on, it's fine and the hubby loves it!  :)


I didn't do much knitting in 2009, but I've really hit the ground running in 2010. I'm currently working on the Corona Hoodie for myself... it's a little slow going because I'm S L O W at knitting.  There's 5" of ribbing and the picture shows ~3".


I also started the Colonnade Shawl from Knitty last night for a gift to my aunt.  If this shawl goes well I'll be making another one for another aunt... both for their birthdays next month.  Hehehe... no WIP picture for this one.

I think I'm a little burned out from sewing.  I've a few sewing projects that I need to finish, but it's just staring at me on my desk.  I'm feeling very "eh" about them... I didn't think this day would ever come!  Hopefully, it won't last too long.  :)

Tuesday, July 28, 2009

Day in the Park Backpack Tote

When I saw the pattern for a Day in the Park Backpack Tote by Liesl+Co, I was instantly in love. I finally ordered a couple of weeks ago when it was on sale, which was just in time to make it for my friend's birthday. I had the perfect fabric, too, I just needed to pick up some notions and contrasting fabric. (I was hording this discontinued Amy Butler fabric for a year and half and finally cut into it for this project. I plenty leftover to make another one for myself! ^__^)

I love this tote! You can wear it was a tote or a backpack... that's so cool!

IMG_0173.JPGIMG_0176.JPG

The pattern itself it very easy to follow. I used a walking foot for the first time and it was perfect! (I highly recommend the walking foot because it's pretty thick and many layers.) The only thing I did differently was that I omitted the rivets. I couldn't find any at Hancock Fabrics so instead, I just tucked in the ends and used a straight stitch.

Can you tell she was excited? ^__^ I'm glad you liked it!

Evening Dress & Clutch

I didn't have any floor length evening dresses for the cruise we took. I looked around the stores to buy one, but they were all short. :( I ended up buying one from Cache for $200... which was more than I wanted to spend. The saleswoman said they only had one floor length dress and what do you know it was in my size. When she handed me the dress I thought it was just ok. When I tried it on, it fit like a glove and looked so elegant... so of course I had to buy it.

This was taken on the cruise by one of the photographers... classic Titanic scene.
fomalday1scannedpicsml.jpg

Well... there were 2 formal nights on the cruise. I had a dressier short dress I could've worn but I wanted another floor length dress. A couple of weeks before the cruise I bought 3 yards of purple stretch satin to make into a formal dress. I'm not sure why I only bought 3 yards though... most patterns required at least 4 or 5 yards. With less than a week left before the trip and only 3 yards for fabric, I turned to Vogue 7848... I decided to make a matching clutch with the leftover fabric, too.

= Strapless Dress #2: Vogue 7848 =
I had just finished this dress in the blue cotton print and it fit very well. I don't think you can tell it's the same dress!! The pattern came with a floor length, but it only came up to my ankles (and I'm not very tall... 5'4"). I used view C, which was the same view as the short version but used the floor length hem. Here are some alterations:

1. Added about 6" to the bottom of all the pieces (When I had sewed all the pieces together they were varying lengths... hehehe... as you can see I was very technical.)
2. Used an invisible zipper
3. Used fusible hem tape. Since the satin was so slippery, I had trouble hemming the dress. I used fusible hem tape first and then went back to sew the hem.
4. Added a satin ribbon like view B. I just eyeballed where the ribbon should go and sewed it in the side seams. I wasn't going to sew the ribbon in, but the ribbon and dress were easily sliding against each other.

Overall, I'm very pleased with the result. The length was perfect with my heels as you can see below.

This is a formal picture taken on the cruise... but you don't get a very good view of the dress. Another "must" cruise scenery...
SmlFormalPicScan.jpg

Here is the classic hanging on the hanger picture...
V7848EveningFullSml.jpg

= Ruffle Clutch =
I used the How-to for the "Gold Ruffle Clutch" on BurdaStyle. Overall it was pretty easy to put together. I just struggled with the slippery satin and the fact that it didn't like to iron very well. The clutch definitely needed a brooch and I had the perfect one. (The brooch is from Hannah D's.) This was such an elegant, perfectly matching clutch.

This picture was taken on my phone so please excuse the quality of the picture...
photo