Wednesday, July 29, 2009

Modified Mid Mod Quilt

I finished my 2nd quilt ever earlier this month, and it turned out much better than my first one . Here are some details.

Pattern: Amy Butler's Mid Mod Quilt
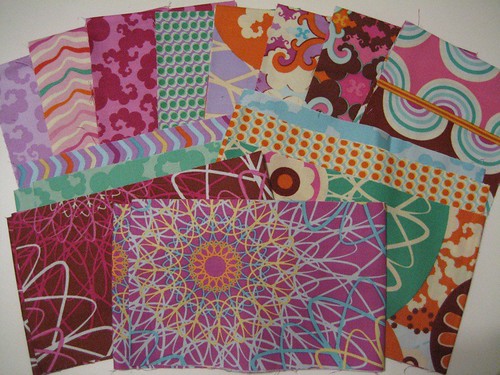
Fabric: mainly Melissa Averinos' Sugar Snap ( Flickr Pool ) and white Kona cotton
Notions: cotton/poly blend batting, quilting safety pins, rotary cutter
Other: lots of patience in measuring and ironing and piecing

I bought the fabric from QuiltHome.com. They have 1/8 yd designer sampler kits, which was perfect for this quilt. I actually have enough scraps to make another quilt. QuiltHome home has a really good selection of designer quilting cottons at reasonable prices.

Isn't Sugar Snap just delicious?!! Below is 1/8 yd for all the pieces in the line.
IMG_8723.JPG

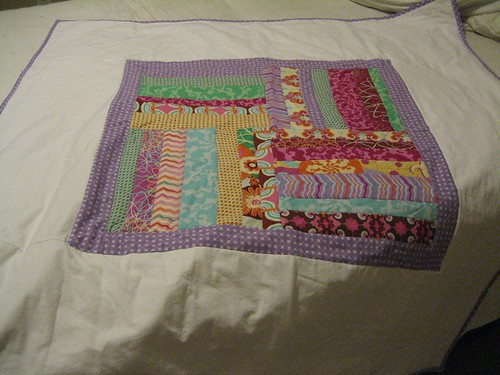
The pattern has you make 9 12"x12" blocks for the center, but I wanted to make this a lap quilt for my grandmother so I only did 4 12"x12" blocks. I adjusted the size of all the pieces to fit this modification. The back of the quilt is just plain white Kona cotton. I only quilted the center blocks along the seams of the different pieces. I really like the way it turned out and the backing didn't bunch up in areas so that was exciting! :)

IMG_9389.JPG

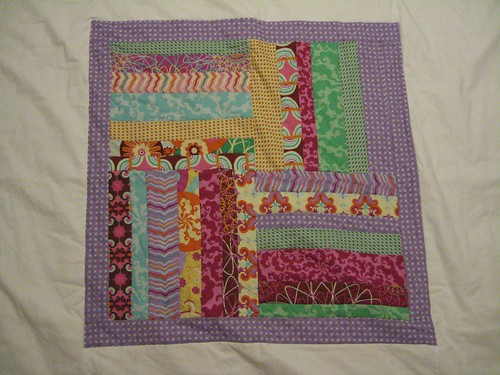
The outer border and binding is Full Moon Forest by Tula Pink also bought from QuiltHome.com.

IMG_9387.JPG

Overall I like how the quilt turned out, but I'm still not sure if I enjoy quilting. I think it's a lot of work that requires patience and meticulous work... I really admire those that can make such beautiful ones such as Film in the Fridge and Pikku Kettu .

Tuesday, July 28, 2009

Day in the Park Backpack Tote

When I saw the pattern for a Day in the Park Backpack Tote by Liesl+Co, I was instantly in love. I finally ordered a couple of weeks ago when it was on sale, which was just in time to make it for my friend's birthday. I had the perfect fabric, too, I just needed to pick up some notions and contrasting fabric. (I was hording this discontinued Amy Butler fabric for a year and half and finally cut into it for this project. I plenty leftover to make another one for myself! ^__^)

I love this tote! You can wear it was a tote or a backpack... that's so cool!

IMG_0173.JPGIMG_0176.JPG

The pattern itself it very easy to follow. I used a walking foot for the first time and it was perfect! (I highly recommend the walking foot because it's pretty thick and many layers.) The only thing I did differently was that I omitted the rivets. I couldn't find any at Hancock Fabrics so instead, I just tucked in the ends and used a straight stitch.

Can you tell she was excited? ^__^ I'm glad you liked it!

Beach Dress M5621

More vacation-wear. I really like the way M5621 turned out! More details below.

=Beach Dress: McCall's 5621=
Many of the reviews said that the dress was short and one of them said that the arms were a little tight for view B. I placed the pattern pieces on myself to get a generally feel for the length and thought that it was do-able so I didn't make any alterations... since I was also thinking of using it as a swimsuit cover-up I didn't mind it being a little bit shorter. I meant to use a smaller seam allowance in the arms to make a little more room, but I forgot to so it is a little tight in the arm area. (Hopefully I can tone down my arms a little more.)

I used this cotton cambric from fabric.com for the main part of the dress. It's a little thin but it's perfect for a cover-up. The neck edging is a white Kona cotton from my stash.

The neck edging for view B (and A) was a little tricky for me. I think I just needed to take my time and go at slowly... I really like the look of it. There are a lot of designer versions of this dress... like the from Trina Turk. (The picture is from Nordstrom's.)


Here is the line drawings for the pattern.


Some alterations/deviations from the pattern...
1. Used french seams for the side seams.
2. Did not use interfacing on the neck edging since the Kona cotton was much heavier

Overall, this dress was a super cute beach cover-up. The neck edging was a little bit wonky but I didn't mind too much. By my measurements, I'm a size 14 but I went down to a size 12. I could still easy pull it on and off... it was just that the arms were a smidge tight.

In front of a shop on Grand Cayman... it was very bright!
M5621PiratesScanned.jpg

Dress on hanger:
M5621HangerSml.jpg

Neckline detail:
M5621NeckDetailSml.jpg

Full review here .

Evening Dress & Clutch

I didn't have any floor length evening dresses for the cruise we took. I looked around the stores to buy one, but they were all short. :( I ended up buying one from Cache for $200... which was more than I wanted to spend. The saleswoman said they only had one floor length dress and what do you know it was in my size. When she handed me the dress I thought it was just ok. When I tried it on, it fit like a glove and looked so elegant... so of course I had to buy it.

This was taken on the cruise by one of the photographers... classic Titanic scene.
fomalday1scannedpicsml.jpg

Well... there were 2 formal nights on the cruise. I had a dressier short dress I could've worn but I wanted another floor length dress. A couple of weeks before the cruise I bought 3 yards of purple stretch satin to make into a formal dress. I'm not sure why I only bought 3 yards though... most patterns required at least 4 or 5 yards. With less than a week left before the trip and only 3 yards for fabric, I turned to Vogue 7848... I decided to make a matching clutch with the leftover fabric, too.

= Strapless Dress #2: Vogue 7848 =
I had just finished this dress in the blue cotton print and it fit very well. I don't think you can tell it's the same dress!! The pattern came with a floor length, but it only came up to my ankles (and I'm not very tall... 5'4"). I used view C, which was the same view as the short version but used the floor length hem. Here are some alterations:

1. Added about 6" to the bottom of all the pieces (When I had sewed all the pieces together they were varying lengths... hehehe... as you can see I was very technical.)
2. Used an invisible zipper
3. Used fusible hem tape. Since the satin was so slippery, I had trouble hemming the dress. I used fusible hem tape first and then went back to sew the hem.
4. Added a satin ribbon like view B. I just eyeballed where the ribbon should go and sewed it in the side seams. I wasn't going to sew the ribbon in, but the ribbon and dress were easily sliding against each other.

Overall, I'm very pleased with the result. The length was perfect with my heels as you can see below.

This is a formal picture taken on the cruise... but you don't get a very good view of the dress. Another "must" cruise scenery...
SmlFormalPicScan.jpg

Here is the classic hanging on the hanger picture...
V7848EveningFullSml.jpg

= Ruffle Clutch =
I used the How-to for the "Gold Ruffle Clutch" on BurdaStyle. Overall it was pretty easy to put together. I just struggled with the slippery satin and the fact that it didn't like to iron very well. The clutch definitely needed a brooch and I had the perfect one. (The brooch is from Hannah D's.) This was such an elegant, perfectly matching clutch.

This picture was taken on my phone so please excuse the quality of the picture...
photo

Sweet Surprises

=Girl's Night Out with Old College Roomies=
We went to Wink for happy hour and had some good 1/2 priced appetizers! Between four girls, we had steamed mussels, burgers, mac&cheese, cheese plate, chicken pate, and salmon. Mmm... so delicious!

Friends + Food + Wine = ^___^

We even got to eat Sprinkles cupcakes straight from L.A. Yummy! I even got a nice little surprise! I saw this post from Haus Maus about the Fujifilm Instax Mini 7s camera back in May and thought it was so cute! Well, I got it as a gift!! ^___^

IMG_0170.JPG

I had so much fun eating, drinking, talking, and just spending time with the girls.

{Thanks, Wenny, for the cupcakes and gift!! Thanks, Viv, for the place to stay!!}

Monday, July 27, 2009

Vogue 7848 Strapless Dress

I finished this dress before the cruise but in between finding pictures and taking another week off and work, it's been pretty hectic.

This is the first item in my summer mini-SWAP. Overall, it was pretty simple to make and very flattering. Based on everyone's review, I went down a size from my pattern measurements (which I normally do anyway for the "Big 4") and it fit almost perfectly.

I had some problems with the invisible zipper... the first zipper was just a bad zipper, but I didn't figure it out until I had already ripped and resewn it about 3 times. Once I realized it, I had to run to Hancock and buy another one... UGH! I was so annoyed. Bad, zipper, very bad...

One of my goals this year was to have neater finishes on the inside... I wasn't sure how to apply that to this dress... here were the problems I was running into:

1. There were a lot of curves due to the princess seams so french seams didn't seam right.
2. Seam binding was a little too bulky for such a fitted dress.

In the end, I only applied seam binding to the seam with the zipper and then to the bodice lining. The rest I just zigzag stitched. Oh well... this should get me by for now.

The only thing I didn't like was that you could see the bottom edge of the facing when it was on. It's such a fitted dress that any bulk on the inside shows. I may take off the seam binding and just do a zig zag stitch to reduce the bulk.

This is my first time "posing" for a picture for something I made... it was a little awkward. It was also a random staircase on the cruise that everyone was using.

IMG_9283.JPG

This is a better view of the front... my hubby and I and our waiters. Our waiters were super nice! ^_^

IMG_9329.JPG

Full review

Wednesday, July 1, 2009

Refashioned Skirt

I've been sort of holding back in sewing for myself because of my weight loss. To date (since mid-January), I've lost a couple of inches around my waist and ALMOST 20 pounds. Running and going to the gym about 4-5 times a week is really paying off! =) I still have at least a 2-3 more inches I want to lose off my waist to reach my goal... slowly but surely I will get there. With all this exercise... it's cut into my sewing time a little bit, but at least I don't have school to worry about this summer. However, my sewing list has grown tremendously since I need clothes that fit! =)

=The Refashioned Skirt=
The skirt was pretty easy since it was a simple refashion of a top. I had started it a couple of months ago and all it need was elastic for the waist.

The top was also too frou frou for me, but I thought it would make a perfect skirt. The bust area was also super tiny... It need lining since it was pretty thin... I just used some navy blue Kona cotton that was in my stash.

Most of the edges were left raw on the actual top, so I didn't hem the lining. Instead, I just used a zigzag stitch across the bottom to keep in from unraveling too much.

IMG_9018 1.JPG

Refashion Navy Skirt.jpg

(Please ignore the strand of string falling down my leg in the last picture... ^__^)